Tips: Industry email experts agree that you should keep your alt-text brief, yet descriptive. Additionally, if a major call to action is embedded in an image, make sure you articulate that in your alt-text.

- 2026+
-
2025+
- Release Notes: December 19
- Release Notes: December 16
- Release Notes: December 9
- Release Notes: December 2
- Release Notes: November 21
- Release Notes: November 18
- Release Notes: November 11
- Release Notes: November 7
- Release Notes: November 4
- Release Notes: October 28
- Release Notes: October 21
- Release Notes: October 14
- Release Notes: October 10
- Release Notes: October 7
- Release Notes: September 30
- Release Notes: September 23
- Release Notes: September 16
- Release Notes: September 9
- Release Notes: August 29
- Release Notes: August 26
- Release Notes: August 19
- Release Notes: August 12
- Release Notes: August 8
- Release Notes: August 5
- Release Notes: July 22
- Release Notes: July 18
- Release Notes: July 15
- Release Notes: July 8
- Release Notes: July 1
- Release Notes: June 27
- Release Notes: June 24
- Release Notes: June 10
- Release Notes: June 6
- Release Notes: June 2
- Release Notes: May 27
- Release Notes: May 23
- Release Notes: May 20
- Release Notes: May 9
- Release Notes: May 6
- Release Notes: April 22
- Release Notes: April 15
- Release Notes: April 8
- Release Notes: March 25
- Release Notes: March 21
- Release Notes: March 18
- Release Notes: March 11
- Release Notes: March 7
- Release Notes: March 4
- Release Notes: February 25
- Release Notes: February 20
- Release Notes: February 18
- Release Notes: February 11
- Release Notes: February 6
- Release Notes: February 4
- Release Notes: January 28
- Release Notes: January 21
- Release Notes: January 17
- Release Notes: January 7
-
2024+
- Release Notes: December 17
- Release Notes: December 10
- Release Notes: December 3
- Release Notes: November 25
- Release Notes: November 20
- Release Notes: November 19
- Release Notes: November 13
- Release Notes: November 12
- Release Notes: November 5
- Release Notes: October 30
- Release Notes: October 29
- Release Notes: October 22
- Release Notes: October 16
- Release Notes: October 15
- Release Notes: October 8
- Release Notes: October 2
- Release Notes: October 1
- Release Notes: September 24
- Release Notes: September 20
- Release Notes: September 17
- Release Notes: September 10
- Release Notes: September 3
- Release Notes: August 27
- Release Notes: August 23
- Release Notes: August 20
- Release Notes: August 13
- Release Notes: August 9
- Release Notes: July 26
- Release Notes: July 12
- Release Notes: June 28
- Release Notes: May 17
- Release Notes: April 26
- Release Notes: April 12
- Release Notes: March 15
- Release Notes: February 23
- Release Notes: February 2
- Release Notes: January 19
-
2023+
- Release Notes: December 22
- Release Notes: November 24
- Release Notes: October 13
- Release Notes: September 29
- Release Notes: September 8
- Release Notes: August 4
- Release Notes: July 14
- Release Notes: June 6
- Release Notes: May 26
- Release Notes: May 5
- Release Notes: April 14
- Release Notes: March 31
- Release Notes: March 17
- Release Notes: March 3
- Release Notes: February 17
- Release Notes: January 20
- 2022+
-
2021+
- Release Notes: November 2 - December 9, 2021
- Release Notes: October 4 - November 1, 2021
- Release Notes: August 7 - October 3, 2021
- Release Notes: June 13 – August 6, 2021
- Release Notes: May 16 – June 12, 2021
- Release Notes: May 2 – 15, 2021
- Release Notes: April 18 – May 1, 2021
- Release Notes: March 21 – April 17, 2021
- Release Notes: March 7 – 20, 2021
- Release Notes: February 7 – March 6, 2021
- Release Notes: January 24 – February 6, 2021
- Release Notes: January 10 – January 23, 2021
- Release Notes: December 6, 2020 – January 9, 2021
-
2020+
- Release Notes: November 22 - December 5, 2020
- Release Notes: November 8 - November 21, 2020
- Release Notes: October 25 - November 7, 2020
- Release Notes: October 11, 2020 – October 24, 2020
- Release Notes: September 27 – October 10, 2020
- Release Notes: September 13, 2020 – September 26, 2020
- Release Notes: August 30, 2020 – September 12, 2020
- Release Notes: August 16, 2020 – August 29, 2020
- Release Notes: August 2, 2020 – August 15, 2020
- Release Notes: July 5, 2020 – August 1, 2020
- Release Notes: June 21, 2020 – July 4, 2020
- Release Notes: June 7, 2020 – June 20, 2020
- Release Notes: May 24, 2020– June 6, 2020
- Release Notes: May 10, 2020 – May 23, 2020
- Release Notes: April 26, 2020 – May 9, 2020
- Release Notes: April 12, 2020 – April 25, 2020
- Release Notes: March 28, 2020 – April 11, 2020
- Release Notes: March 16, 2020 – March 27, 2020
- Release Notes: March 1, 2020 – March 15, 2020
- Release Notes: COVID-19 Related Release Notes
- Release Notes: January 1, 2020 – February 29, 2020
- 2019+
- 2018+
- 2017-
- 2016+
- 2015+
- 2014+
- 2013+
- 2012+
Release Notes: Autumn '17
- Campaign Center
- Customer Service Representative Enhancements
- eGift
- Messaging
- Responsive Guest Website
- Online Ordering Integrations
- iPad Merchant Processor Application
- Aloha
- Par PixelPoint
- Paytronix Improvements
- Other Acknowledgments
Campaign Center
Add a Measure
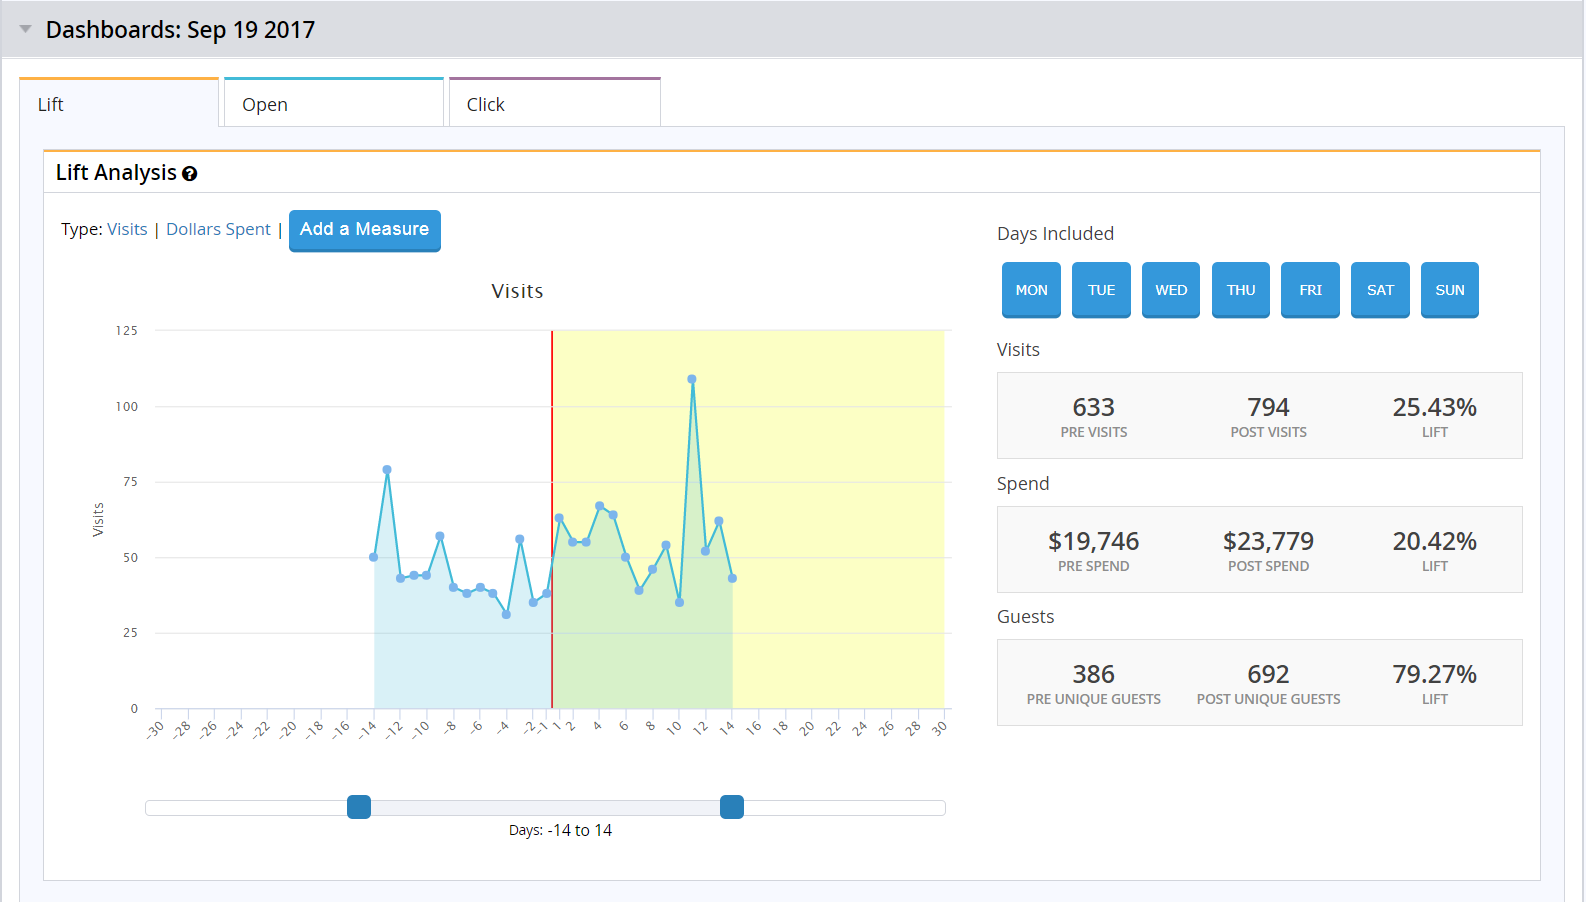
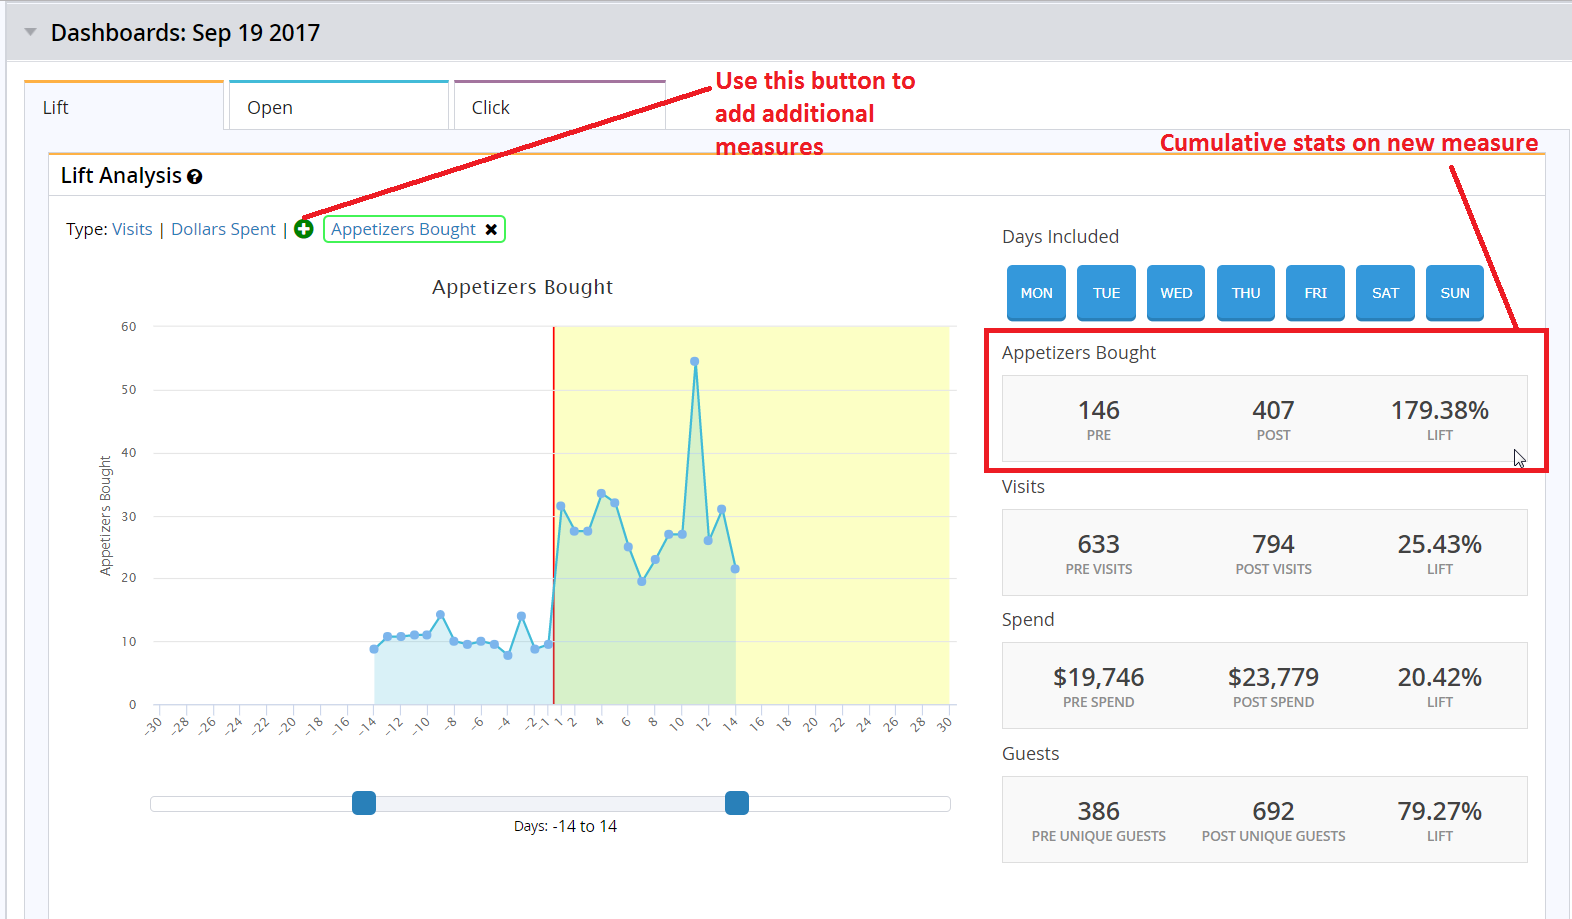
The latest addition to the Campaign Center enables you to understand changes in your guests’ behavior beyond visits and spending. When viewing the results of a campaign, you can now add additional measures to generate a Lift Graph and cumulative analysis of Adder or Points wallets. For example, if you have an “Appetizers Bought” tracking wallet, you can now view the impact the campaign had on the number of appetizers purchased during the campaign.
How to Add a Measure
When viewing the Lift Analysis of a campaign, you will now see a blue “Add a Measure” button next to the Visits and Dollars Spent links (see screenshot). When clicked, a searchable drop-down list of all adder and internal wallets will appear. Select one wallet to generate a new Lift Graph measuring its activity. A new row to the right of the graph will also appear, displaying pre- and post-campaign cumulative stats for your chosen wallet.

Once you’ve added a new measure:
- Add as many additional measures as you want by clicking the green “+” button.
- Measures that you add for a campaign occurrence will be visible to all members of your organization who have access to the Campaign Center.
- When you run a Target and Control campaign, you will see the Lift Graph and statistics for the wallet showing target group and control group activity separately.
- All functionality available for the default Visits and Dollars Spent graphs is available for the Add Another Measure graphs.

Customer Service Representative Enhancements
Claim a Missed Visit with Forgot Card Code
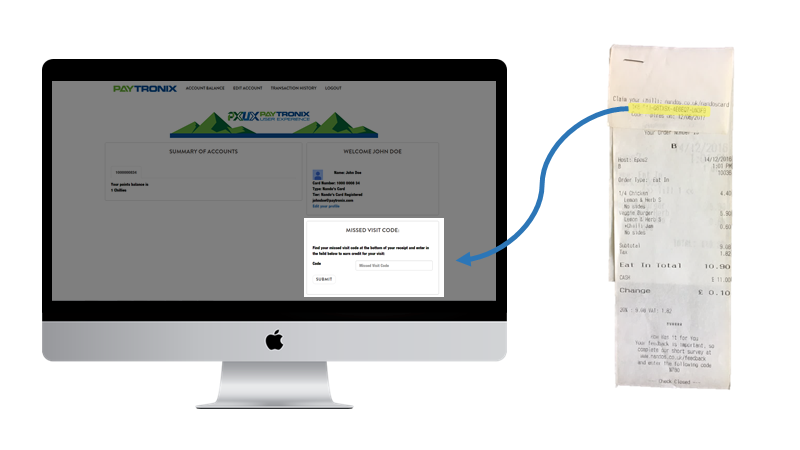
Your guests sometimes forget to mention they’re a loyalty member. Give them a way to claim their visit after the fact with Paytronix’s Forgot Card Code functionality. Now available on Micros and Aloha integrations, this feature generates a unique code on receipts. Guests simply enter the code on your loyalty website (this works on both Paytronix-hosted or third-party, integrated pages) to allow the guest to accrue points. Codes expire after a fixed period, configurable by your brand.
Please reach out to your Technology Consultant to get started.

Wallet Adjustment Groups
Tailor your wallet permissions to the user groups within your organization for more effective workflow. The new Wallet Adjustment Groups page enables you to establish the list of wallets that a specific user group in your organization can adjust. For example, if you run a multi-concept company, you can now assign a concept-specific subset of wallets as adjustable for brand-specific customer service representatives (CSRs). You could establish, for example, that CSRs in your burger concept will only see and make adjustments to the free burger, fries, and points wallets.
Simply click on the “Wallet Adjustment Group” page on Merchant Home and click the edit button that appears next to each group to add or subtract wallets they can view.
Permission groups who do not have permissions to adjust wallets will not appear on this list.
By default, permission groups with the power to make wallet adjustments will have the ability to adjust all wallets.
eGift
Change an eGift’s Future Delivery Date
Your CSRs can now change the delivery date for a specific eGift order if the customer has elected to deliver it on a future date. To update the order delivery date, simply look up an eGift order in Web Order Lookup, click on the delivery date, and select the new desired date of execution for the gift. You can even select same-day execution. To complete the process, click the “Update and Resend” button.
Google reCAPTCHA Technology
Google reCAPTCHA technology is now present on the responsive eGift page. reCAPTCHA requires customers to complete a simple check step (in other words, clicking the “I’m Not a Robot” checkbox) before submitting an eGift order.
reCAPTCHA prevents automated attacks on your website that target your customer’s data and protect customer information. You do not need to do anything to enable reCAPTCHA on your responsive pages, however, you may need to whitelist a specific IP address for the technology to function properly. If you have any questions about this update, please reach out to your technology consultant.
To learn more about Google reCAPTCHA technology and its advantages, click here.
Messaging
Email Tool: Introducing Image Alt-Text
As of the latest release, you can now add alternative text (alt-text) to your email images. Alt-text benefits your customer experience in a multitude of ways. For example, alt-text fosters an inclusive experience for visually-impaired customers, since it is picked up by device screen readers. Additionally, alt-text appears even if your customers have disabled automatic image loading. In this case, alt-text becomes a powerful tool for you to communicate the value and benefit of your email to your customers in the absence of images.
How to Use Alt-Text
First, navigate to the email template to which you would like to add alt-text. You can add alt-text to existing and brand-new templates in both the upload image flow and a dedicated alt-text path. Both are described in more detail below.
Uploading a New Image
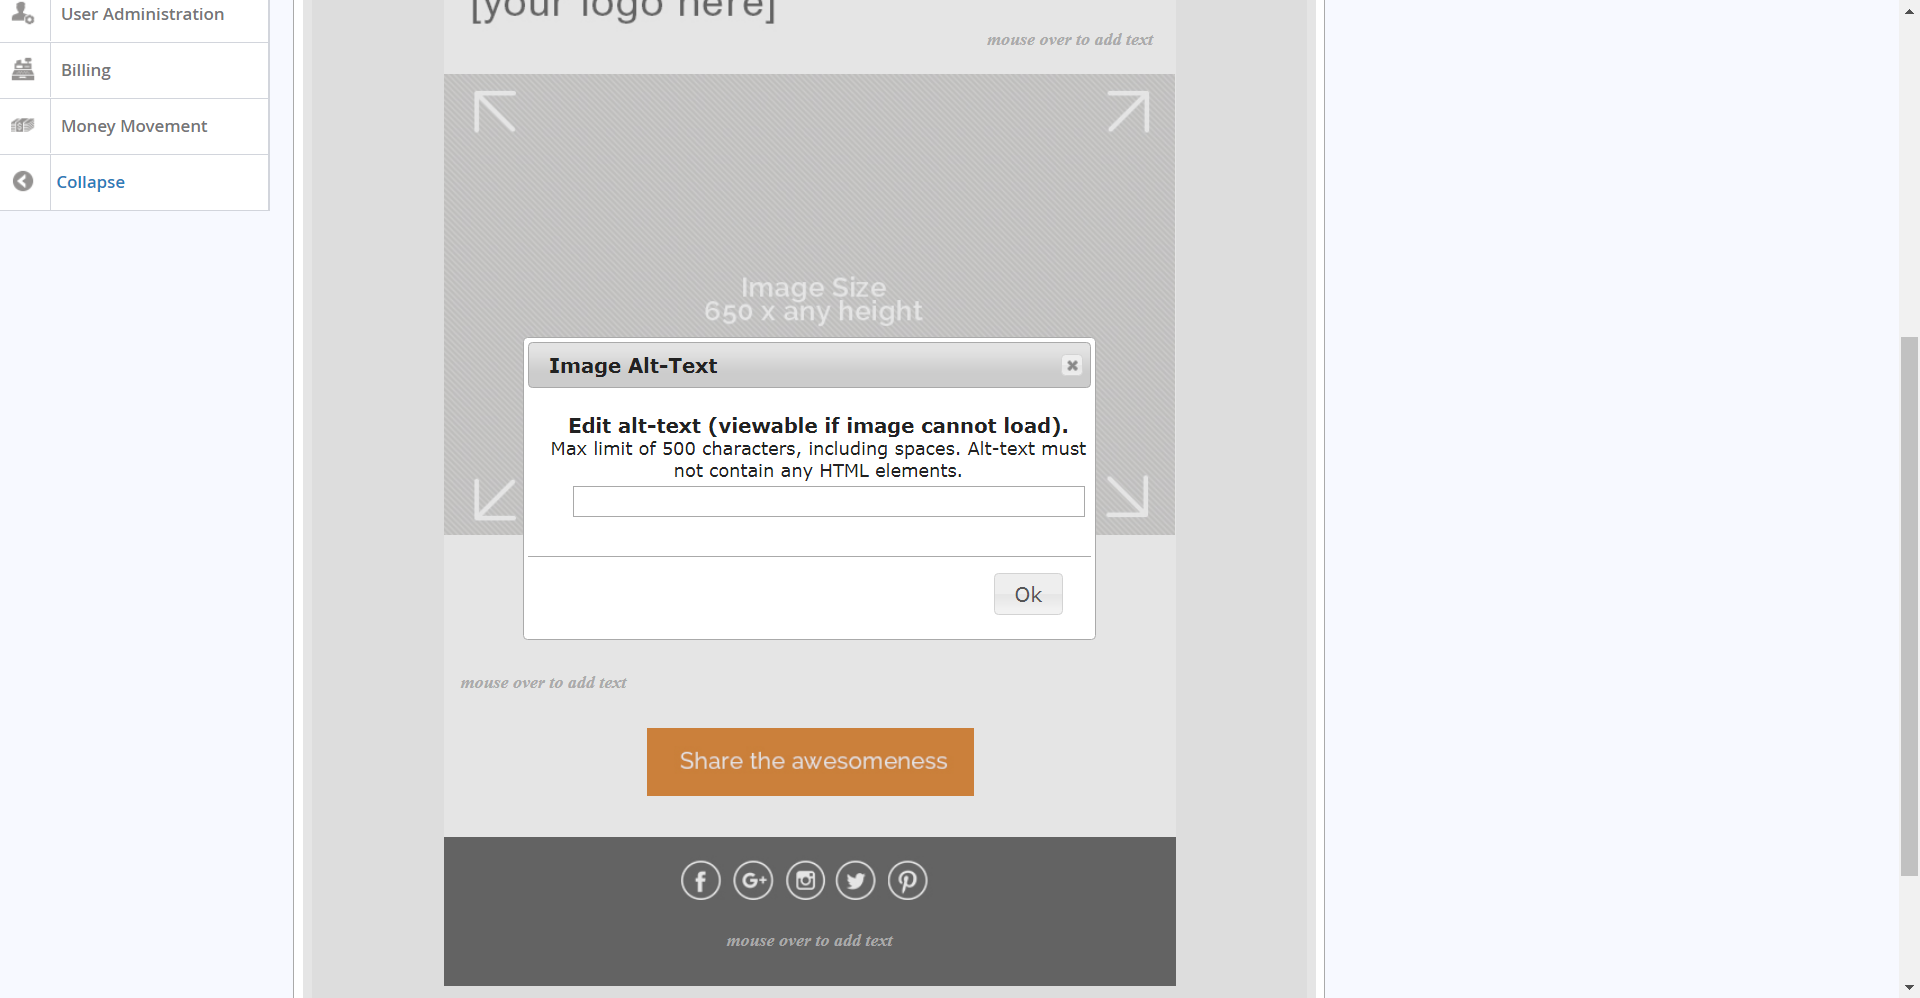
Add alt-text upon uploading your image. Adding alt-text is strongly encouraged, though it is not required. According to best practices, you should keep your alt-text description concise, so the system will limit you to 500 characters, including spaces.
Changing or Adding Alt-Text on an Existing Image
If you did not add in your alt-text upon initial upload of the image, you can add it in later, simply by clicking on the gear icon (screenshot below). Again, ensure your alt-text is shorter than 500 characters, including spaces.


Responsive Guest Website
ADA Compliance Adjustments
Paytronix has completed an initial set of compliance changes related to the Americans with Disabilities Act on all responsive guest website pages. These changes will enable your brand to be inclusive of customers with disabilities. ADA changes are ongoing and may require additional future adjustments.
The compliance changes were identified by one of three ADA compliance platforms: Tenon.io, the Web Accessibility Evaluation Tool (WAVE), or the Accessibility Developer Tools (a Google Chrome plugin). Paytronix has fixed compliance issues characterized as critical errors (visualized in these platforms as red errors) and tested these adjustments to ensure compliance.
For technical documentation on ADA changes, please reach out to your Technology Consultant.
Online Ordering Integrations
Third Party Single Sign On (SSO) in the Branded App
Paytronix customers can now integrate the online ordering provider of your choice with your company's branded mobile application. This exciting feature allows your guests to log in to your app a single time, and seamlessly access online ordering.
iPad Merchant Processor Application
Loyalty and Gift Integrations
Paytronix now supports both loyalty and gift functionality it the merchant processor app. The app offers a clean, intuitive interface for your operations team, enhancing your customer experience. If you’re interested in learning more about software setup and hardware requirements, please reach out to your sales representative.
Aloha
Take advantage of new, relevant reward options to engage your loyal customers.
Size Upgrades
You can now add rewards that will give your guests a free size upgrade. Let your guests try a larger size with their loyalty card and easily track the promotion’s boost inside the Paytronix system.
Bundled Pricing
In the Aloha integration, clients can now offer bundled price rewards. This reward will enable the merchant to discount multiple items across different categories for a single price. For example, you could offer customers a burger and shake for $8, a breakfast sandwich and coffee for $3, and more. You can also choose to include or exclude modifiers from the promotion.
Please reach out to your Technology Consultant for setup information.
Par PixelPoint
New Gift Card Integration
Adding to our list of more than 28 different POS integrations, Paytronix has added support for gift card functionality in addition to our loyalty integration with PixelPoint. This includes selling new cards to your customers as well as reloading to their balance. Bulk sale is also supported for any large orders your customers place. The minimum PixelPoint version required to use this functionality is V12.3.9.
Paytronix Improvements
Connectivity Status Summary Table
Easily track your stores’ connection status to Paytronix with this new graphical summary of your connected and disconnected stores. Simply click on the "Store Connectivity Status" page, which you can find under the Customer Service navigation header.
At the top of the page, you will notice three key metrics reported:
- The number of stores connected, represented in the green box.
- The number of stores that missed the last ping interval, represented in the yellow box.
- The number of stores that are not connected, represented in the red box.
Other Acknowledgments
Third-Party Library Software
- Apache Software Foundation: This product (Paytronix) includes software developed by the Apache Software Foundation (http://www.apache.org/), including: Apache Commons, Apache httpClient, Xerces, log4j, Jakarta Commons, Apache Jakarta-Oro, APR snprintf library, Apache FOP, and Apache Batik.
- Exolab Project: This product (Paytronix) includes software developed by the Exolab Project (http://www.exolab.org), including: Castor.
- Sun Microsystems, Inc.: This product (Paytronix) includes software developed by Sun Microsystems, Inc. (http://www.sun.com), including: Java Cryptography Extension (JCE), Java Communications API, and Secure Sockets Extension (JSSE) – which also includes code licensed from RSA Data Security.
- SourceForge.net: This product (Paytronix) includes software developed by SourceForge.net and distributed under the Common Public License, including WTL and distributed through a ZLib License for tinyxml.
- Thai Open Source Software Center Ltd, Clark Cooper, and Expat maintainers: This product (Paytronix) includes software developed by Thai Open Source Software Center Ltd, Clark Cooper, and Expat maintainers including Expat XML Parser Library.
- Jean-loup Gailly and Mark Adler: This product (Paytronix) includes software developed by Jean-loup Gailly and Mark Adler including ZLib Compression Library.
- JCIFS smb client in Java. This product (Paytronix) uses software developed by Michael B Allen, distributed by GNU Lesser General Public License as published by the Free Software Foundation, including jCIFS SMB client in Java. Paytronix has made modifications to this software. Pursuant to the GNU LGPL, we are posting the changes to the code made on our website. Please see www.paytronix.com/download/jcifs/jcifs.tar.gz
- Mort Bay Consulting: This product (Paytronix) includes Jetty Web Server developed by Jan Bartel and Greg Wilkins and other contributors.
- Hypersonic SQL. This product (Paytronix) includes products developed by Hypersonic SQL. This software is provided by the copyright holders and contributors “as is” and any express or implied warranties, including, but not limited to, the implied warranties of merchantability and fitness for a particular purpose are disclaimed. In no event shall the Hypersonic SQL Group, or contributors be liable for an direct, indirect, incidental, special, exemplary, or consequential damages (including, but not limited to, procurement of substitute goods or services; loss of use, data, or profits; or business interruption) however caused and on any theory of liability, whether in contract, strict liability, or tort (including negligence or otherwise) arising in any way out of the use of this software, even if advised of the possibility of such damage. This software consists of voluntary contributions made by individuals on behalf of the Hypersonic SQL Group. Copyright © 1995 – 2000, The Hypersonic SQL Group. All rights reserved.
- The HSQL Development Group. This product (Paytronix) includes products developed by The HSQL Development Group. This software is provided by the copyright holders and contributors “as is” and any express or implied warranties, including, but not limited to, the implied warranties of merchantability and fitness for a particular purpose are disclaimed. In no event shall the HSQL Development Group, HSQLDB.org, or contributors be liable for an direct, indirect, incidental, special, exemplary, or consequential damages (including, but not limited to, procurement of substitute goods or services; loss of use, data, or profits; or business interruption) however caused and on any theory of liability, whether in contract, strict liability, or tort (including negligence or otherwise) arising in any way out of the use of this software, even if advised of the possibility of such damage.
- Eclipse SWT. This product (Paytronix) contains products developed by Eclipse SWT.
