The report can output a maximum of 95 days’ worth of data.

- 2026+
-
2025+
- Release Notes: December 19
- Release Notes: December 16
- Release Notes: December 9
- Release Notes: December 2
- Release Notes: November 21
- Release Notes: November 18
- Release Notes: November 11
- Release Notes: November 7
- Release Notes: November 4
- Release Notes: October 28
- Release Notes: October 21
- Release Notes: October 14
- Release Notes: October 10
- Release Notes: October 7
- Release Notes: September 30
- Release Notes: September 23
- Release Notes: September 16
- Release Notes: September 9
- Release Notes: August 29
- Release Notes: August 26
- Release Notes: August 19
- Release Notes: August 12
- Release Notes: August 8
- Release Notes: August 5
- Release Notes: July 22
- Release Notes: July 18
- Release Notes: July 15
- Release Notes: July 8
- Release Notes: July 1
- Release Notes: June 27
- Release Notes: June 24
- Release Notes: June 10
- Release Notes: June 6
- Release Notes: June 2
- Release Notes: May 27
- Release Notes: May 23
- Release Notes: May 20
- Release Notes: May 9
- Release Notes: May 6
- Release Notes: April 22
- Release Notes: April 15
- Release Notes: April 8
- Release Notes: March 25
- Release Notes: March 21
- Release Notes: March 18
- Release Notes: March 11
- Release Notes: March 7
- Release Notes: March 4
- Release Notes: February 25
- Release Notes: February 20
- Release Notes: February 18
- Release Notes: February 11
- Release Notes: February 6
- Release Notes: February 4
- Release Notes: January 28
- Release Notes: January 21
- Release Notes: January 17
- Release Notes: January 7
-
2024+
- Release Notes: December 17
- Release Notes: December 10
- Release Notes: December 3
- Release Notes: November 25
- Release Notes: November 20
- Release Notes: November 19
- Release Notes: November 13
- Release Notes: November 12
- Release Notes: November 5
- Release Notes: October 30
- Release Notes: October 29
- Release Notes: October 22
- Release Notes: October 16
- Release Notes: October 15
- Release Notes: October 8
- Release Notes: October 2
- Release Notes: October 1
- Release Notes: September 24
- Release Notes: September 20
- Release Notes: September 17
- Release Notes: September 10
- Release Notes: September 3
- Release Notes: August 27
- Release Notes: August 23
- Release Notes: August 20
- Release Notes: August 13
- Release Notes: August 9
- Release Notes: July 26
- Release Notes: July 12
- Release Notes: June 28
- Release Notes: May 17
- Release Notes: April 26
- Release Notes: April 12
- Release Notes: March 15
- Release Notes: February 23
- Release Notes: February 2
- Release Notes: January 19
-
2023+
- Release Notes: December 22
- Release Notes: November 24
- Release Notes: October 13
- Release Notes: September 29
- Release Notes: September 8
- Release Notes: August 4
- Release Notes: July 14
- Release Notes: June 6
- Release Notes: May 26
- Release Notes: May 5
- Release Notes: April 14
- Release Notes: March 31
- Release Notes: March 17
- Release Notes: March 3
- Release Notes: February 17
- Release Notes: January 20
- 2022+
-
2021+
- Release Notes: November 2 - December 9, 2021
- Release Notes: October 4 - November 1, 2021
- Release Notes: August 7 - October 3, 2021
- Release Notes: June 13 – August 6, 2021
- Release Notes: May 16 – June 12, 2021
- Release Notes: May 2 – 15, 2021
- Release Notes: April 18 – May 1, 2021
- Release Notes: March 21 – April 17, 2021
- Release Notes: March 7 – 20, 2021
- Release Notes: February 7 – March 6, 2021
- Release Notes: January 24 – February 6, 2021
- Release Notes: January 10 – January 23, 2021
- Release Notes: December 6, 2020 – January 9, 2021
-
2020+
- Release Notes: November 22 - December 5, 2020
- Release Notes: November 8 - November 21, 2020
- Release Notes: October 25 - November 7, 2020
- Release Notes: October 11, 2020 – October 24, 2020
- Release Notes: September 27 – October 10, 2020
- Release Notes: September 13, 2020 – September 26, 2020
- Release Notes: August 30, 2020 – September 12, 2020
- Release Notes: August 16, 2020 – August 29, 2020
- Release Notes: August 2, 2020 – August 15, 2020
- Release Notes: July 5, 2020 – August 1, 2020
- Release Notes: June 21, 2020 – July 4, 2020
- Release Notes: June 7, 2020 – June 20, 2020
- Release Notes: May 24, 2020– June 6, 2020
- Release Notes: May 10, 2020 – May 23, 2020
- Release Notes: April 26, 2020 – May 9, 2020
- Release Notes: April 12, 2020 – April 25, 2020
- Release Notes: March 28, 2020 – April 11, 2020
- Release Notes: March 16, 2020 – March 27, 2020
- Release Notes: March 1, 2020 – March 15, 2020
- Release Notes: COVID-19 Related Release Notes
- Release Notes: January 1, 2020 – February 29, 2020
- 2019+
- 2018+
- 2017+
- 2016+
- 2015-
- 2014+
- 2013+
- 2012+
Release Notes: v15.7
- Email Tool
- Paytronix Improvements
- Responsive Guest Website
- Account Filter
- Dashboards and Analyzers
- Reports
- Transaction History
- Other Acknowledgements
Email Tool
Copying Emails
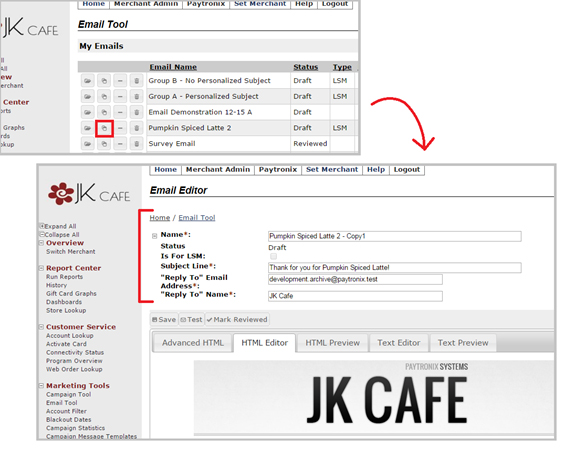
Marketers can now copy their emails and master templates in a matter of seconds! There is a new icon on the Email Tool landing page that will allow you to easily copy an existing email from your list. As you can see below, after selecting the copy icon, all header information will be copied over, including the subject line, "Reply To" email address, and "Reply To" name. The email name will also be copied, with “Copy - N” appended to the name, where “N” is the number of times the emails has been copied.
The copy icon will also be available for master templates as well, allowing you to make copies of your existing master templates. The master template name will again have the “Copy – N” appended to it. Below you can see where the icon sits with the other three icons, to the left of each email and master template. Selecting the copy icon will bring you to the Email Editor section, with the header information copied over, as explained above.
Creating New Emails
When you create new emails and base it on an existing email, all header information will now be copied over, similar to the way the copy icon functions, as explained above. If you choose the “Create New Email” button, you will first be prompted to decide how to create the email. If you select “Existing Email,” then all header information will populate below that selector, including the subject line, "Reply To" Email Address, "Reply To" Name, and the email name. The email name will have “Copy – N” appended to it, where “N” represents the number of times the email has been copied.
Email Seed List
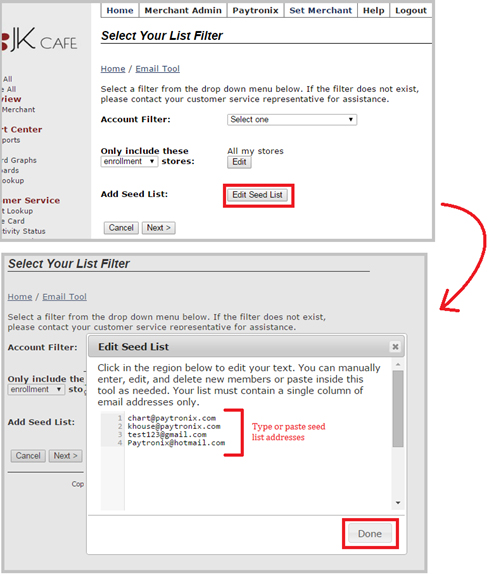
As of V15.7, you can add a seed list to the list of members receiving your email campaign. This allows email marketers to send the message to members of your corporate team, local store managers, and stakeholders. The editable seed list can be created on the fly by entering the addresses you wish to include, or by copying your list from a local file and pasting it into your seed list.
The seed list is created on the “Select Your List Filter” page that appears after choosing the “Select Lists” button on the “Email Editor” page. You will see the button labeled “Edit Seed List,” which will prompt a pop-up box with instructions on how to add to the list.
Email addresses added to this seed list will be excluded from campaign statistics. If your email contains substitution parameters, they will populate using the Paytronix defaults and will not represent actual member data, if it exists.
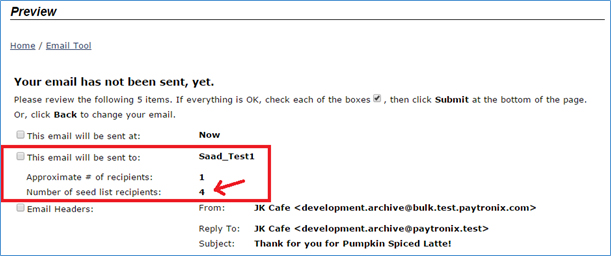
Once you have selected the filter, date, and time for your email, you will be brought to this final “preview” screen, where each section has a check box presented for approval. The check box pertaining to the filter or total list of recipients will now display both the number of recipients in your filter as well as the number of addresses in your seed list. As you can see above, there are four members on our seed list and, in the image below, the number “4” appears next to the “Number of seed list recipients” label.
Paytronix Improvements
In the latest release, Paytronix has implemented the following enhancements.
Mobile App Image Manager – Blocking Unreadable Area
When you’re uploading a background image or home screen image for your mobile application, you can now see where the top and bottom navigation bars will obscure your image before you submit them.
Geofencing Location Tracking
We increased the number of tracked locations per device from ten to twenty. This increases the level of data collection possible through our location-based geofencing messages.
Campaign Message Templates Improvement
If you include special characters (including ampersands and less-than symbols) in your push, pull, or SMS messages, our system will now automatically convert the character from plain text to its HTML encoded value. This will help ensure that your campaign is compatible with mobile devices and delivered without issue.
The special character will be edited upon submission of the template. For example, if you write the following push message: “It’s that time again – come on down for fajitas & margaritas!” Upon submission, the ampersand will be automatically reformatted in the template. Instead, you will see: “It’s that time again – come on down for fajitas & margaritas!” Don’t be alarmed by the technical change.
Responsive Guest Website
We are continuously adding to our suite of responsive, mobile-friendly customer-facing webpages. These webpages ensure that your customers will have a pleasant experience logging in, checking their balance, joining your eClub, and more on their smartphones and tablets.
The following pages are now available:
- eClub Registration and eClub Edit Account – Guests can sign up to receive messages from your eClub!
- Web Order History – Logged in users can view items they have purchased through your loyalty interface.
Easier Packaging
Paytronix customer support representatives now have a simple tool for moving your responsive customer website from our test server to our live server.
Looking to switch your customer portal to our responsive, mobile-friendly pages? Reach out to your technology consultant to learn more.
Account Filter
Updates to Phone Number Filter
You can now filter your customer database by the presence (or absence) of mobile phone number, home phone number, or fax number. This will help you target all members of your programs that either have or have not submitted this information to you.
Dashboards and Analyzers
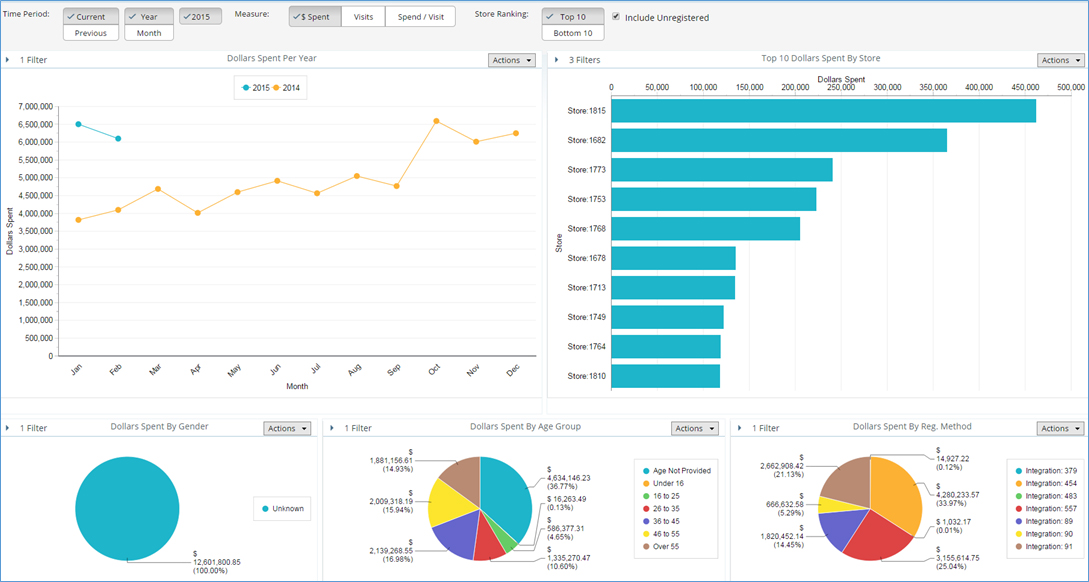
We discovered that some our clients were not able to access our business intelligence (BI) tools, due to incompatible firewall and router settings. These settings blocked the connection to the port through which the dashboards are accessed. As of this release, we have changed the URL and the port, which will allow our clients to access our dashboard suite. You should not have to change any security settings in order to gain access.
If you find that you still cannot access the BI dashboards and analyzers, please open your firewall settings and make an exception for both IP addresses listed below:
- 64.94.240.17 – This is the merchant website and is already configured in your system.
- 64.94.240.26 – This is the IP address of the BI tool.
Dashboards are available on the merchant home page under Report Center on the left navigation pane.
Reports
CSR Wallet Adjustment Detail Report
Paytronix has added a new CSR Wallet Adjustment report. This report provides details on merchant users who are adjusting wallets on accounts. It also includes the username of the CSR that made a particular adjustment, accounts affected by the adjustment, comments recorded during the process, the store associated with the adjustment, and more. This report will provide a great indication on how and why wallets are being adjusted by your staff.
You can find this report under the Key Reports section of the Report Center. If you are unable to see it, ask your technology consultant to provide you with the necessary permissions. Users can apply date range, store, card template, and wallet filters.

Loyalty Reward Redemption Summary Report
In our latest release, we have updated the Loyalty Reward Redemption Report. Previously, the report’s summary table displayed rewards redeemed and expired in a single cell. Now, the report will display rewards redeemed and expired in separate columns. This change will provide details on which rewards are actually being redeemed by guests versus expired by the system or a campaign. It provides a helpful barometer through which redemption rates can be measured.

Transaction History
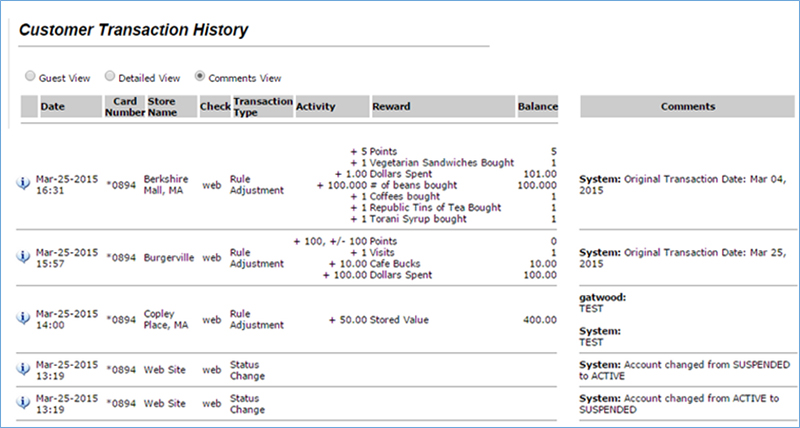
Comment View
We have added a fantastic comment view feature on the Customer Transaction History page. This feature allows merchants to view historical wallet adjustments and associated comments, giving CSRs a useful snapshot of a member’s activity over time. To see the comment view, simply select Comments View at the top of the page, to the right of the Detailed View.
Other Acknowledgements
1. Third-Party Library Software
- Apache Software Foundation: This product (Paytronix) includes software developed by the Apache Software Foundation (http://www.apache.org/), including: Apache Commons, Apache httpClient, Xerces, log4j, Jakarta Commons, Apache Jakarta-Oro, APR snprintf library, Apache FOP, and Apache Batik.
- Exolab Project: This product (Paytronix) includes software developed by the Exolab Project (http://www.exolab.org), including: Castor.
- Sun Microsystems, Inc.: This product (Paytronix) includes software developed by Sun Microsystems, Inc. (http://www.sun.com), including: Java Cryptography Extension (JCE), Java Communications API, and Secure Sockets Extension (JSSE) – which also includes code licensed from RSA Data Security.
- SourceForge.net: This product (Paytronix) includes software developed by SourceForge.net and distributed under the Common Public License, including WTL and distributed through a ZLib License for tinyxml.
- Thai Open Source Software Center Ltd, Clark Cooper, and Expat maintainers: This product (Paytronix) includes software developed by Thai Open Source Software Center Ltd, Clark Cooper, and Expat maintainers including Expat XML Parser Library.
- Jean-loup Gailly and Mark Adler: This product (Paytronix) includes software developed by Jean-loup Gailly and Mark Adler including ZLib Compression Library.
- JCIFS smb client in Java. This product (Paytronix) uses software developed by Michael B Allen, distributed by GNU Lesser General Public License as published by the Free Software Foundation, including jCIFS SMB client in Java. Paytronix has made modifications to this software. Pursuant to the GNU LGPL, we are posting the changes to the code made on our website. Please see www.paytronix.com/download/jcifs/jcifs.tar.gz
- Mort Bay Consulting: This product (Paytronix) includes Jetty Web Server developed by Jan Bartel and Greg Wilkins and other contributors.
- Hypersonic SQL. This product (Paytronix) includes products developed by Hypersonic SQL. This software is provided by the copyright holders and contributors “as is” and any express or implied warranties, including, but not limited to, the implied warranties of merchantability and fitness for a particular purpose are disclaimed. In no event shall the Hypersonic SQL Group, or contributors be liable for an direct, indirect, incidental, special, exemplary, or consequential damages (including, but not limited to, procurement of substitute goods or services; loss of use, data, or profits; or business interruption) however caused and on any theory of liability, whether in contract, strict liability, or tort (including negligence or otherwise) arising in any way out of the use of this software, even if advised of the possibility of such damage. This software consists of voluntary contributions made by individuals on behalf of the Hypersonic SQL Group. Copyright © 1995 – 2000, The Hypersonic SQL Group. All rights reserved.
- The HSQL Development Group. This product (Paytronix) includes products developed by The HSQL Development Group. This software is provided by the copyright holders and contributors “as is” and any express or implied warranties, including, but not limited to, the implied warranties of merchantability and fitness for a particular purpose are disclaimed. In no event shall the HSQL Development Group, HSQLDB.org, or contributors be liable for an direct, indirect, incidental, special, exemplary, or consequential damages (including, but not limited to, procurement of substitute goods or services; loss of use, data, or profits; or business interruption) however caused and on any theory of liability, whether in contract, strict liability, or tort (including negligence or otherwise) arising in any way out of the use of this software, even if advised of the possibility of such damage.
- Eclipse SWT. This product (Paytronix) contains products developed by Eclipse SWT.
