
- 2026+
-
2025+
- Release Notes: December 19
- Release Notes: December 16
- Release Notes: December 9
- Release Notes: December 2
- Release Notes: November 21
- Release Notes: November 18
- Release Notes: November 11
- Release Notes: November 7
- Release Notes: November 4
- Release Notes: October 28
- Release Notes: October 21
- Release Notes: October 14
- Release Notes: October 10
- Release Notes: October 7
- Release Notes: September 30
- Release Notes: September 23
- Release Notes: September 16
- Release Notes: September 9
- Release Notes: August 29
- Release Notes: August 26
- Release Notes: August 19
- Release Notes: August 12
- Release Notes: August 8
- Release Notes: August 5
- Release Notes: July 22
- Release Notes: July 18
- Release Notes: July 15
- Release Notes: July 8
- Release Notes: July 1
- Release Notes: June 27
- Release Notes: June 24
- Release Notes: June 10
- Release Notes: June 6
- Release Notes: June 2
- Release Notes: May 27
- Release Notes: May 23
- Release Notes: May 20
- Release Notes: May 9
- Release Notes: May 6
- Release Notes: April 22
- Release Notes: April 15
- Release Notes: April 8
- Release Notes: March 25
- Release Notes: March 21
- Release Notes: March 18
- Release Notes: March 11
- Release Notes: March 7
- Release Notes: March 4
- Release Notes: February 25
- Release Notes: February 20
- Release Notes: February 18
- Release Notes: February 11
- Release Notes: February 6
- Release Notes: February 4
- Release Notes: January 28
- Release Notes: January 21
- Release Notes: January 17
- Release Notes: January 7
-
2024+
- Release Notes: December 17
- Release Notes: December 10
- Release Notes: December 3
- Release Notes: November 25
- Release Notes: November 20
- Release Notes: November 19
- Release Notes: November 13
- Release Notes: November 12
- Release Notes: November 5
- Release Notes: October 30
- Release Notes: October 29
- Release Notes: October 22
- Release Notes: October 16
- Release Notes: October 15
- Release Notes: October 8
- Release Notes: October 2
- Release Notes: October 1
- Release Notes: September 24
- Release Notes: September 20
- Release Notes: September 17
- Release Notes: September 10
- Release Notes: September 3
- Release Notes: August 27
- Release Notes: August 23
- Release Notes: August 20
- Release Notes: August 13
- Release Notes: August 9
- Release Notes: July 26
- Release Notes: July 12
- Release Notes: June 28
- Release Notes: May 17
- Release Notes: April 26
- Release Notes: April 12
- Release Notes: March 15
- Release Notes: February 23
- Release Notes: February 2
- Release Notes: January 19
-
2023+
- Release Notes: December 22
- Release Notes: November 24
- Release Notes: October 13
- Release Notes: September 29
- Release Notes: September 8
- Release Notes: August 4
- Release Notes: July 14
- Release Notes: June 6
- Release Notes: May 26
- Release Notes: May 5
- Release Notes: April 14
- Release Notes: March 31
- Release Notes: March 17
- Release Notes: March 3
- Release Notes: February 17
- Release Notes: January 20
- 2022+
-
2021+
- Release Notes: November 2 - December 9, 2021
- Release Notes: October 4 - November 1, 2021
- Release Notes: August 7 - October 3, 2021
- Release Notes: June 13 – August 6, 2021
- Release Notes: May 16 – June 12, 2021
- Release Notes: May 2 – 15, 2021
- Release Notes: April 18 – May 1, 2021
- Release Notes: March 21 – April 17, 2021
- Release Notes: March 7 – 20, 2021
- Release Notes: February 7 – March 6, 2021
- Release Notes: January 24 – February 6, 2021
- Release Notes: January 10 – January 23, 2021
- Release Notes: December 6, 2020 – January 9, 2021
-
2020+
- Release Notes: November 22 - December 5, 2020
- Release Notes: November 8 - November 21, 2020
- Release Notes: October 25 - November 7, 2020
- Release Notes: October 11, 2020 – October 24, 2020
- Release Notes: September 27 – October 10, 2020
- Release Notes: September 13, 2020 – September 26, 2020
- Release Notes: August 30, 2020 – September 12, 2020
- Release Notes: August 16, 2020 – August 29, 2020
- Release Notes: August 2, 2020 – August 15, 2020
- Release Notes: July 5, 2020 – August 1, 2020
- Release Notes: June 21, 2020 – July 4, 2020
- Release Notes: June 7, 2020 – June 20, 2020
- Release Notes: May 24, 2020– June 6, 2020
- Release Notes: May 10, 2020 – May 23, 2020
- Release Notes: April 26, 2020 – May 9, 2020
- Release Notes: April 12, 2020 – April 25, 2020
- Release Notes: March 28, 2020 – April 11, 2020
- Release Notes: March 16, 2020 – March 27, 2020
- Release Notes: March 1, 2020 – March 15, 2020
- Release Notes: COVID-19 Related Release Notes
- Release Notes: January 1, 2020 – February 29, 2020
- 2019+
- 2018+
- 2017+
- 2016+
- 2015+
- 2014-
- 2013+
- 2012+
Release Notes: v14.12
- Geofencing
- Local Store Charity Programs
- Messaging
- Account Filters
- Responsive Guest Website
- Report Center and Dashboards
- eGift Improvements
- CSR Improvements
- Rest API Updates
- Infrastructure
- Other Acknowledgements
Geofencing
New Geofencing Center
Merchants can now send location-based messages to guests through the merchant portal. Geofencing messages surface on the lock screen of iOS and Android devices when an eligible guest walks inside the virtual circumference drawn around your location.
To utilize geofencing with the Paytronix mobile application, clients must upgrade their application. Geofencing will be available on the iOS platform by August, 2014. Android will follow in the fall of 2014. Individual mobile applications will track up to 10 store locations – the first being the user’s specified favorite store (or, if this does not exist, his or her enrollment store) and the nine closest locations to that initial store.
Geofencing functionality is also available via the REST API (see page 10 for more details).
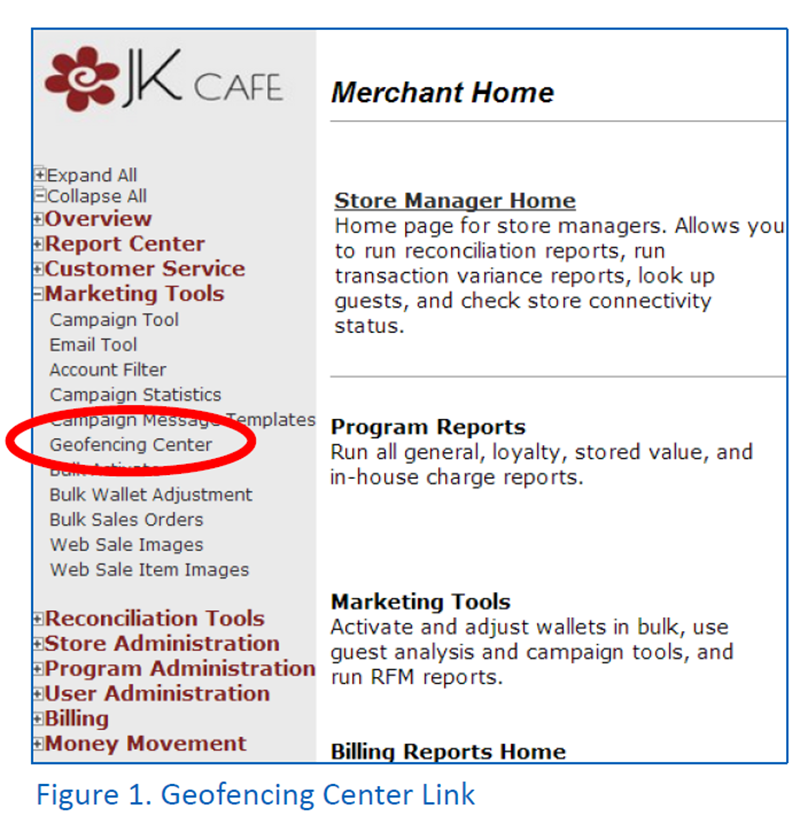
To begin, simply click “Geofencing Center” on the left navigation (Figure1). If you do not see the Geofencing Center, contact your technology consultant. This center includes all of the actions that you’ll need to set up the feature and deploy campaigns, including: Settings, Reports, and Campaigns. Each section is explored in more depth below.
Settings
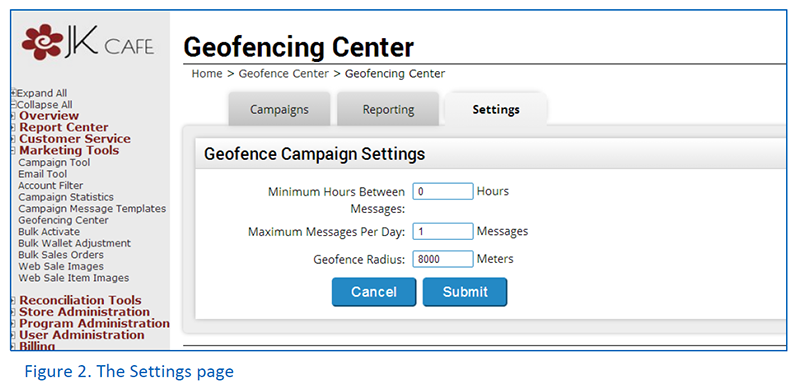
The geofencing settings page (Figure 2) allows you to configure your geofencing program at the merchant-level, setting valuable restrictions on the geofencing messages deployed to your consumers. They are:
- Minimum Hours between Messages: Set the minimum hours that must pass between the first message you send a member and the second. For example, the input of “5” would mean that five hours must pass between the first message deployed to a member and the second.
- Maximum Messages per Day: This is the maximum number of messages you can send any eligible guest in a 24-hour period. Geofencing messages should be used sparingly and effectively.
- Geofence Radius: Here, you can set the radius length from the longitude and latitude point (in meters). This radius you specify will determine the virtual circumference of your fence around the store location. We recommend keeping the radius tight (approximately 1 mile) to increase message relevance.
Campaigns
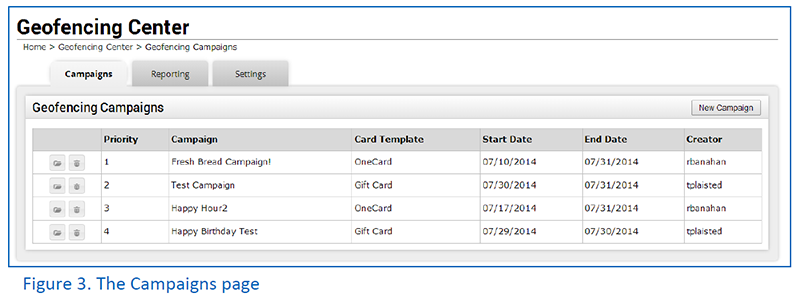
The Campaign section of the Geofencing Center will give merchant users an overview of their active campaigns (Figure 3). Merchant users can drag and drop campaigns to change the priority of the campaign – which determines which message should go first if an app user fits more than one filter profile.
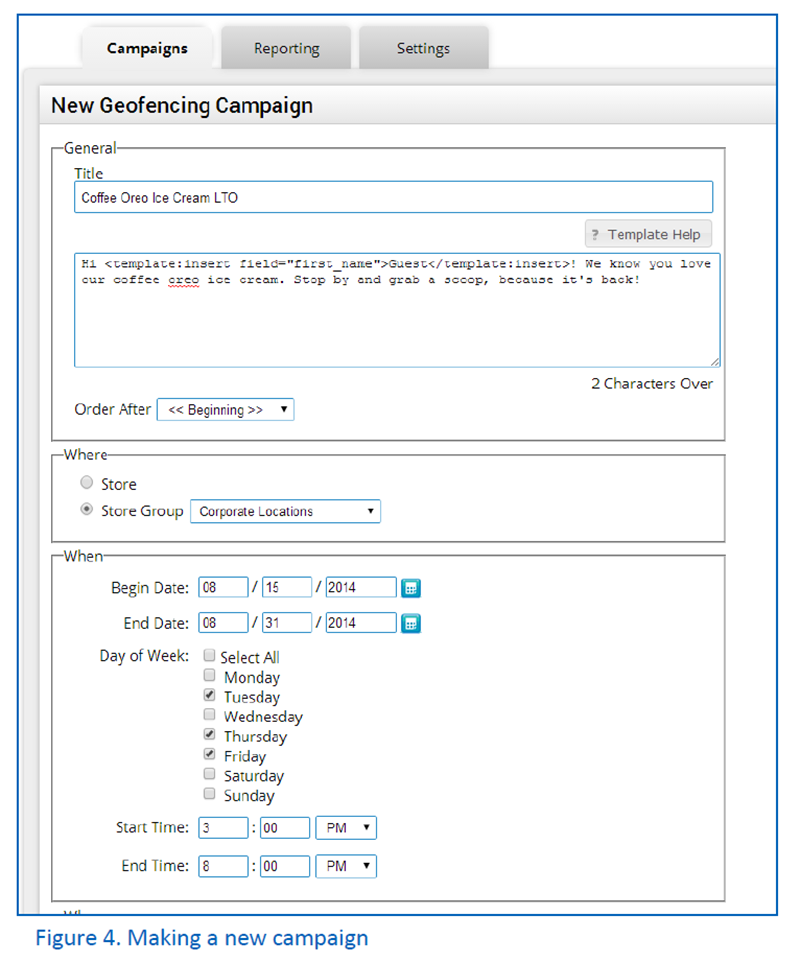
Setting up a new geofencing campaign is quick and painless. Merchant users should simply click the “New Campaign” button. On the campaign setup page, merchants can define the message they would like to send in the geofencing campaign as well as the time of day, days of week, specific stores to which they’d like to apply the campaign (Figure 4). The message can even include cardholder- or transaction-specific substitution parameters.
Remember: Geofencing messages can be extremely potent if sent to the right segment of guests at the right time. Pay special attention to make sure that the when matches up with the message being sent out. Think of it this way: Would you want to receive a happy hour message when you drive by a restaurant at 6 AM?
Also, you can further segment your geofencing message to go to specific tiers within your card template and to guests who have a particular wallet balance, answer to a custom question, or perk.
Reports – Coming Soon!
In a future release, you will be able to track geofencing campaign statistics, total messages sent by store, and visits by age group with the help of a handy business intelligence dashboard. The dashboard will be housed within the Geofencing Center.
Local Store Charity Programs
Charitable programs are a great method for companies to give back to the community and raise awareness of its brand at the same time. The local store charity feature allows merchants to partner with local and national charities of their choice and raise money for them through guest purchase behavior. For example, a brand can donate $1 dollar to a nonprofit for every burger entrée purchased by its loyalty members.
Guests participate using their loyalty card to earn on behalf of their favorite charitable program(s).
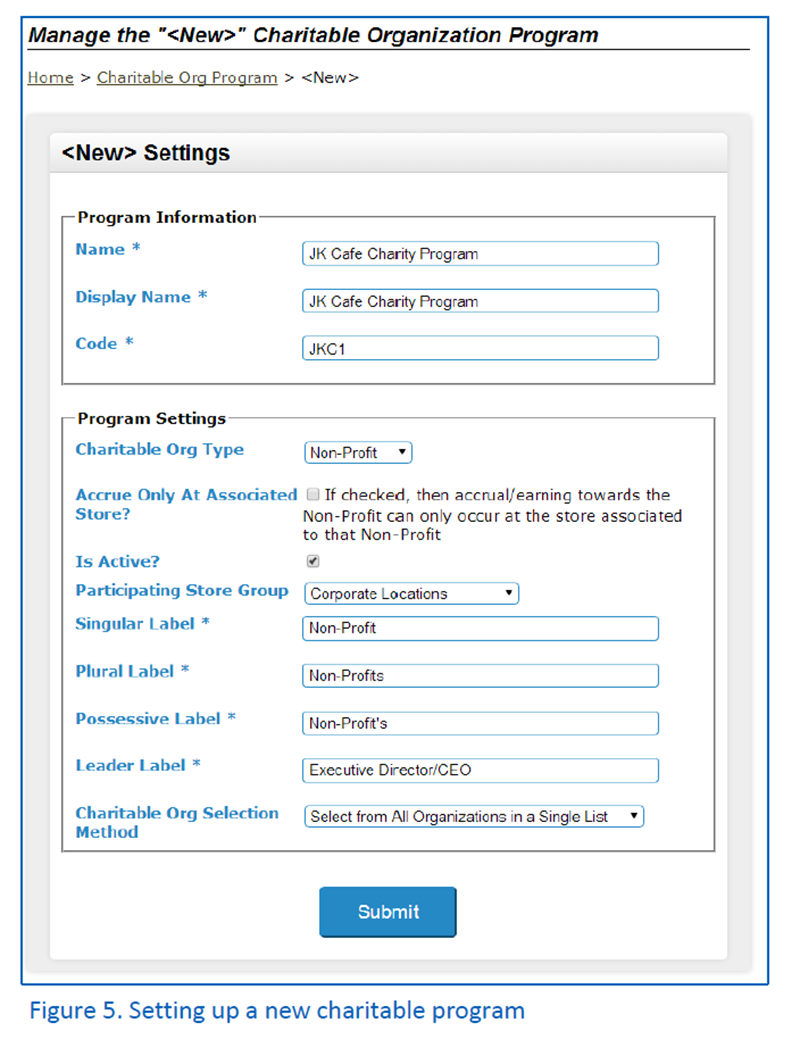
Merchants create charitable programs on the Paytronix merchant website (Figure 5). Merchants can easily add the various charitable organizations (such as schools, non-profit organizations, or foundations) to the Paytronix system.
Merchants should contact their Technology Consultant for additional details.
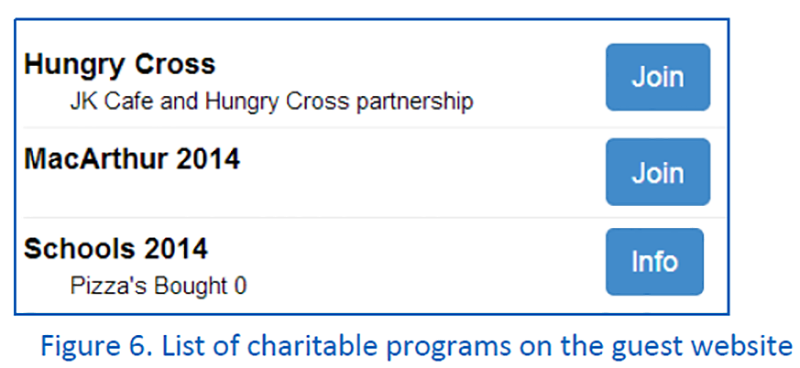
Guests opt in to participate in specific charitable program(s) through the Paytronix guest website on the account balance page (Figure 6). Guests can accrue dollars or specific products for the selected charity.
Once the program has ended, restaurants can make a donation to the charity based on aggregate accrual reports. Clients get detailed reports on each guest that participates in the program, including which organization they’re donating to, products purchases, dollars spent, card number and more.
Messaging
eClub to Loyalty Conversion
Most marketers want to know how many of their eClub members they are converting to their loyalty program. They also want to separate these two distinct groups of people – those who belong to the eClub and those who belong to the loyalty program. Typically, marketers wanted to send emails to eClub members with special offers to join the loyalty club without sending emails to those who have already converted to loyalty.
This feature solves these challenges and makes it easy for marketers to determine their conversion rate between programs.
Since this feature impacts card templates, your technology consultant will need to set it up for you. Here’s how it works:
In a simple case, a merchant would have one card template for its eClub members and another card template for its loyalty members.
Paytronix can set up the card templates in such a way that the system automatically tracks conversions from eClub to loyalty and marks the remaining eClub account as “converted.” Conversion takes place when an existing eClub member attempts to enroll in the loyalty program with the same email address. When accounts in the eClub are marked “converted” the marketer can no longer email those accounts within the eClub card template. But, they can send emails to them under the loyalty card template. This solves the issue of having duplicate emails across eClub and loyalty.
The user experience,
- Joining an eClub. If the user has joined the loyalty program and attempts to then join the eClub with the same email address, a message would appear asking the user to login using their loyalty program information.
- Joining a loyalty program. If the user is already an eClub member and completes the loyalty enrollment process with the same email address, the system will mark the eClub member account as “converted” and add the member to the loyalty card template.
- Joining a loyalty program using the reverse enrollment link. If the reverse enrollment link is used to prompt eClub member conversion to loyalty, the form will contain the email address on file. If the user changes the email address in the form, the initial email address stored in the eClub card template, will be marked “converted.”
To view the accounts that have converted from one card template to another, the merchant can run a Guest Analysis report with filters set to target the “Source” card template and Account Status equal to “CONVERTED.” In the eClub to loyalty example, the Source would be the eClub card template.
Click Through
Email marketers depend on click through in the absence of a point of sales integration to measure consumer engagement with messages. We’ve added click through reporting to our campaign statistics to accommodate the growing number of merchants that are leveraging the Paytronix system to host their eClubs. We will add a click through dashboard to the available Dashboards within the next two months so that merchants can view the unique and total clicks by link.
Setting it up
If you are a messaging client and would like to begin tracking email click behavior, please let your technology consultant know. That person will enable the feature. Once the feature is enabled, the system will automatically track all of the links that existing in your email templates.
What you’ll see
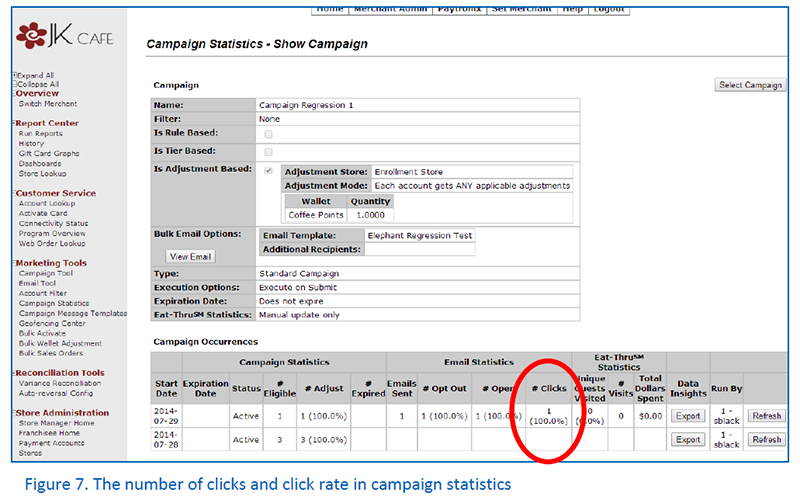
With this latest release, email marketers can see the number of unique clicks (Figure 7) each campaign occurrence compelled along with a click through rate. See image below.
- Number of Clicks. The number of unique accounts that clicked a link within the email.
- Percent of Clicks. Of the total number of emails sent, the proportion of unique accounts that clicked a link within the email.
Account Filters
New Data Insights Tie
Data Insights clients can now send campaigns to banded and tagged accounts. As of V14.12, Data Insights clients can create a campaign that targets specific bands or tagged accounts (Figure 8).
- Banding categorizes guests by spend and visit behavior, giving clients an indication of guest engagement with the brand. With the new DI Band account filter, clients can send campaigns to a specific segment, increasing relevancy while measuring the effectiveness of the campaign.
- Tagged Accounts – At times clients and strategists run ad-hoc queries using our Business Intelligence tool. These reports generate guest segments for clients. The Tagged Accounts filter imports the ad-hoc analysis for use in the campaign tool to send targeted messages to the guests the client wants to target.

Relative Between Date Condition
It is now possible to set up a time filter condition that is within X and Y time increments in the future or in the past (Figure 9). This new condition is available in the date of birth, anniversary date, enrollment date, registration date, date of guest information changes, date used, last stored value reload date, last guest activity date, and gift card expiration date. Additional information on this filter includes:
- Time increments available are day(s), week(s) and month(s).
- The filter can only look at 13 months of past or future activity at a time.
- X must be greater than zero and less than or equal to Y.
For example, clients can now create a filter that looks for birthdays within the last 1 and 2 weeks ago.

Responsive Guest Website
The following pages have been added to Paytronix’s responsive guest website suite:
- Manage cards
- Email Verification
- Challenges
- Pull Message Center
We are continuing to expand the list above to include all of the features available in the non-responsive legacy webpages. Please keep in mind that, in order to take advantage of the new responsive pages, all of your features must be supported. Please contact us if you would like to learn more about how you can implement this responsive design.
Report Center and Dashboards
Account Code Column Now Available
As of V14.12, the customer account code (also known as the account ID) is available in the Combined Cards, Exchanged Cards, and Guest Analysis Reports. The Account ID is a great unique identifier, which supersedes card number. This change will help clients with their own database keep track of unique accounts, rather than relying on card numbers, which could be exchanged at any time.
Redesigned Dashboard Page
The redesigned dashboards page allows merchants to easily and quickly find the metrics they’re looking for. Dashboards are now categorized by type, and can be collapsed or expanded as needed. A search function has been built in to further facilitate quick finds. When a merchant hovers over a dashboard, a blurb appears describing the dashboards function. Merchants can also return to saved reports, which are located under the “My Dashboards” header.
Save Public and Private Analyzers
In V14.12, merchant users can save their custom analyzers either privately or publically (Figure 10). Private analyzers will only display on the dashboard page of the logged-in user and will not be visible to other merchant users. If the user saves the analyzer publically, all merchant users will be able to view it.
To access your analyzers, log in to the merchant website and click on the Dashboards link under the Report Center. If you would like additional training, please contact your technology consultant.

eGift Improvements
Substitution Parameter Improvement
The order date and item value email substitution parameters are now available in the eGift Order Item Fulfillment Email.
Use the following format to include the substitution parameters:

CSR Improvements
Customer Recharge History Page
It is now possible for CSRs to view the recharge history on an account through account lookup. Simply select the customer record you would like to view, and click “Recharge History” on the left navigation. To access this link, the “CSR Recharge History” permission must be enabled for a particular user.
The page will display a table with relevant recharge information (Figure 11), including: transaction date, credit card information, transaction amount, and relevant notes. If a failure occurs, the error will be recorded under the “Notes” column and will be marked as “Failed” in the “State” column.
CSRs can click the “Examine” link in the Action column to learn more about a particular row. This drill down will display the Reference Number, Authorization Code and Response Code.

Rest API Updates
Guest Services
The following calls are now available in the guest service:
- isCardCombinable: This call checks whether or not a card can be combined to the main account.
- changeCardStatus: This new call allows you to enable or disable a card.
- accountInformation Updates: The Account ID field will now be returned in the accountInformation response. This will help integrators keep track of guests even if they’ve performed a media exchange – trading one card number in for another.
Region Event Services for Geofencing
The following Region Event endpoints are now available to support geofencing.
- Get Region Definitions: Obtains a list of regions which the user’s device should monitor. Also, this method provides a special OAuth token that should be used to authenticate Post Region Event calls.
- Geofencing Post Region Event: This endpoint is called when a user crosses a monitored region boundary.
Encoding Update
By default, Paytronix interprets all REST calls as ISO-8859-1 (also known as latin1). As of this release, if integrators set the Accept-Charset setting to UTF-8, we will respect that encoding instead of ISO-8859-1. UTF-8 encoding allows integrators to include various characters and accented letters that are unsupported by ISO-8859-1.
Store Service: Search Stores nearby a Specified Zip Code
The new nearbyStoresForPostalCode endpoint obtains information about stores within a certain distance of a point within the given postal code. This REST endpoint enables integrations to show stores within a particular postal code (ZIP code).
Transaction Service: Adding End Date
The dateEnd parameter is now available in the transaction history request. This will allow you to look at a set of transactions over a finite period of time – in the call you can specify dateStart as well as dateEnd. The date end string is optional. If used, it should be formatted as yyyy-mm-dd (e.g., 2014-07-01).
Infrastructure
Performance Improvements to Account Query, Transaction History and Campaign Statistics
Real-time reporting is now available for account queries, transaction history and campaign statistics for both the POS and Merchant Website.
- Account lookup – Servers and merchants can now query real-time registered cards via phone number.
- Transaction History Loads in Real Time: Servers, merchants, and guests can view the entire account transaction history in real time at the POS, merchant website, or customer website. On both the merchant and customer website, the transaction history page will display the last 30 days of transactions. To show more, merchants and customers can click to display additional transactions.
- Campaign Statistics – As of this release, the Select a Campaign and Campaign Statistics pages are populated in real-time after the execution of a campaign.
File Upload Improvements
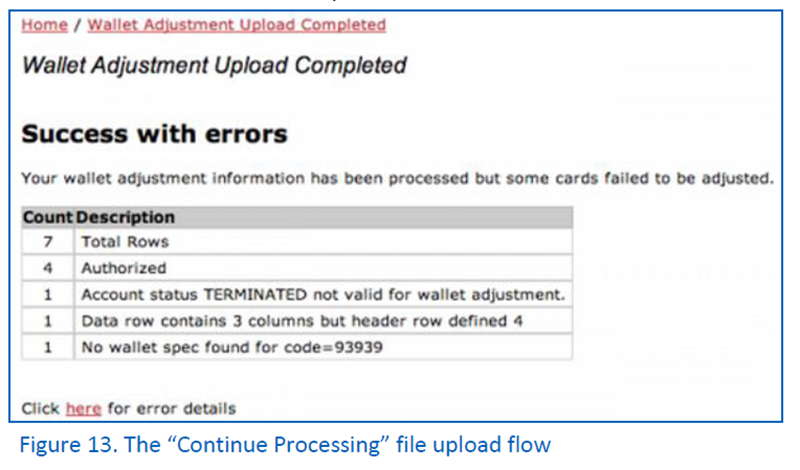
We are continuing to improve our activation, wallet adjustment, and account information file upload process to facilitate better service to our clients. In this release, we’ve enhanced our error processing, adjustment logic and email notifications. There are two options to complete file uploads: Abort Processing or Continue Processing. Let’s take a look at each in greater detail.
Abort Processing Option
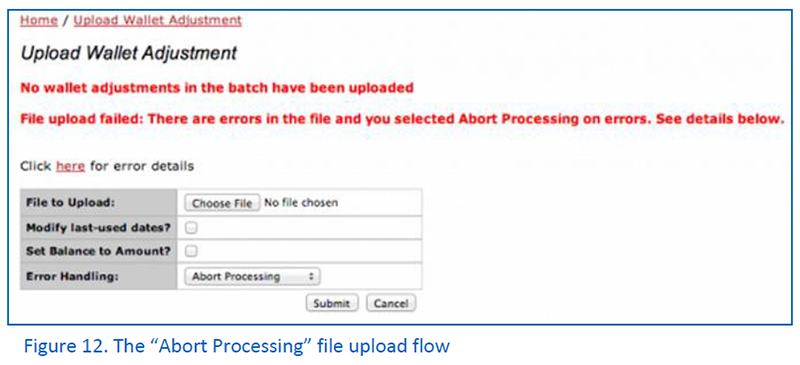
If a validation and/or adjustment issue is found, the upload will stop and a message will appear on the merchant website informing users of the error(s). Users will be presented a link which leads to a TSV file containing all errors in the upload file (Figure 12). Users can download the file to view detailed error information.
For scheduled uploads, an email message will be sent to the failure notification email address on file. The email will display a summary of the error(s) and contain a link that leads to the aforementioned TSV file. TSV files will remain accessible for the following seven days after the upload.
Continue Processing Option
For this style of file upload, the upload will process regardless of any validation and/or adjustment issues. When the upload completes, a message will display informing users of successes and failures (Figure 13). The key difference is that this option will continue to process as many rows as possible and then display the results. If there are any errors, a link containing a TSV file is available for download and review.
For scheduled uploads, an email message will be sent to the failure notification email address. The email will display summary statistic on authorization and errors. The email will also contain a link to a TSV file, which will be available for download and review. As mentioned above, the TSV file will expire and become unavailable after the seventh day.
Wallet Adjustment Improvements
Paytronix technology consultants now have a simplified way of adjusting a wallet. Wallets can now be adjusted to specific amount for a select group of card numbers. For example, Paytronix technology consultants can now upload a list that sets all point balances to five.
New Content Delivery Network (CDN)
Expect improved load time for static images and links in emails. Paytronix works with a partner to serve images from servers closer to the user, which will speed up image load times and reduce the risk of bandwidth congestion to more critical servers.
Other Acknowledgements
1. Third-Party Library Software
- Apache Software Foundation: This product (Paytronix) includes software developed by the Apache Software Foundation (http://www.apache.org/), including: Apache Commons, Apache httpClient, Xerces, log4j, Jakarta Commons, Apache Jakarta-Oro, APR snprintf library, Apache FOP, and Apache Batik.
- Exolab Project: This product (Paytronix) includes software developed by the Exolab Project (http://www.exolab.org), including: Castor.
- Sun Microsystems, Inc.: This product (Paytronix) includes software developed by Sun Microsystems, Inc. (http://www.sun.com), including: Java Cryptography Extension (JCE), Java Communications API, and Secure Sockets Extension (JSSE) – which also includes code licensed from RSA Data Security.
- SourceForge.net: This product (Paytronix) includes software developed by SourceForge.net and distributed under the Common Public License, including WTL and distributed through a ZLib License for tinyxml.
- Thai Open Source Software Center Ltd, Clark Cooper, and Expat maintainers: This product (Paytronix) includes software developed by Thai Open Source Software Center Ltd, Clark Cooper, and Expat maintainers including Expat XML Parser Library.
- Jean-loup Gailly and Mark Adler: This product (Paytronix) includes software developed by Jean-loup Gailly and Mark Adler including ZLib Compression Library.
- JCIFS smb client in Java. This product (Paytronix) uses software developed by Michael B Allen, distributed by GNU Lesser General Public License as published by the Free Software Foundation, including jCIFS SMB client in Java. Paytronix has made modifications to this software. Pursuant to the GNU LGPL, we are posting the changes to the code made on our website. Please see www.paytronix.com/download/jcifs/jcifs.tar.gz
- Mort Bay Consulting: This product (Paytronix) includes Jetty Web Server developed by Jan Bartel and Greg Wilkins and other contributors.
- Hypersonic SQL. This product (Paytronix) includes products developed by Hypersonic SQL. This software is provided by the copyright holders and contributors “as is” and any express or implied warranties, including, but not limited to, the implied warranties of merchantability and fitness for a particular purpose are disclaimed. In no event shall the Hypersonic SQL Group, or contributors be liable for an direct, indirect, incidental, special, exemplary, or consequential damages (including, but not limited to, procurement of substitute goods or services; loss of use, data, or profits; or business interruption) however caused and on any theory of liability, whether in contract, strict liability, or tort (including negligence or otherwise) arising in any way out of the use of this software, even if advised of the possibility of such damage. This software consists of voluntary contributions made by individuals on behalf of the Hypersonic SQL Group. Copyright © 1995 – 2000, The Hypersonic SQL Group. All rights reserved.
- The HSQL Development Group. This product (Paytronix) includes products developed by The HSQL Development Group. This software is provided by the copyright holders and contributors “as is” and any express or implied warranties, including, but not limited to, the implied warranties of merchantability and fitness for a particular purpose are disclaimed. In no event shall the HSQL Development Group, HSQLDB.org, or contributors be liable for an direct, indirect, incidental, special, exemplary, or consequential damages (including, but not limited to, procurement of substitute goods or services; loss of use, data, or profits; or business interruption) however caused and on any theory of liability, whether in contract, strict liability, or tort (including negligence or otherwise) arising in any way out of the use of this software, even if advised of the possibility of such damage.
- Eclipse SWT. This product (Paytronix) contains products developed by Eclipse SWT.
